My first attempt came out ok.
But there were a few things I wanted to change about it. One of them was the sleeves because they were a little too baggy. I also needed to ease the neck area more.
I fixed the pattern up and made it again. This time the sleeves were too small. Rrrr!
I chopped the sleeves down because they were tightest at the bottom so at least I can still wear it, and I think I finally have the sleeves right. I guess I'll find out for sure when I cut out another one!
Here's the second one:
I love the bands (cuffs) on the cardigan. Bands are my favorite way to hem sleeves and bottoms of shirts because they're so cute. If you don't have a coverstitch machine, bands are the easiest way to hem because you don't have to worry about your sewing machine stretching out the seam. The stretching happened to me a lot before I had a coverstitch machine, even if I used a walking foot and a twin stretch needle.
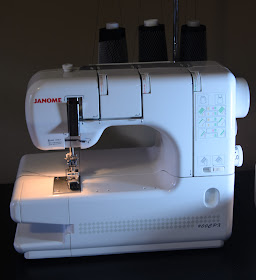
We'll talk more about those awesome bands in a minute but first, if I'm going to keep going on about my coverstitch machine then maybe I should tell you a bit more about what it is exactly.
 |
| My coverstitch machine. |
A coverstitch machine is a kind of overlock machine. A serger is also an overlock machine, but a coverstitch machine doesn't cut anything away as it sews and the loopers don't pass the thread above the fabric.
 |
| Coverstitch looper. |
You can buy a serger and a coverstitch as one machine. I have separate machines though, and I like that because you have to disengage the cutter to coverstitch if you have the two functions together.
The best way to see what a coverstitch does is to go find one of your store bought t-shirts and check out the hem. That double row of stitching at the bottom is from a coverstitch machine.
 |
| Top and underside of a coverstitch hemmed t-shirt. |
It comes in handy for much more than just hemming, though. But we can talk about that another day.
Now, back to those cuffs. To add a cuff to a sleeve, the first thing you need to do is figure out how wide you'd like your finished cuff to be. We'll say we want to have a two inch finished cuff.
To figure out the width of the strip we need to cut, we need to double the finished width. That will give us four inches. Then we need to add a seam allowance to both sides of the strip. We'll use a half inch seam allowance. That means we need to add one inch for the seam allowance (one half on each side of the strip). So we need to cut a strip that is 5 inches wide.
Width of cuff = Finished width x 2 + seam allowance x 2.
Now we need to figure out the length of the cuff. I think the easiest way to do this is to measure around your arm where the cuff will go with a tape measure. Cut your strip the correct width, and as long around as your arm is. You will probably end up cutting some off since the cuff will stretch, but this will give you a good length to start with.
If you like your cuffs really loose, then you could add a couple inches to your arm measurement.
Wrap the strip around your arm and decide how tight you would like it to be. Pin it to mark the desired tightness.
Then, add a seam allowance to both ends of the strip and cut the rest off. Now you have your strip. Cut another one for the other arm.
Fold the cuff so that the short ends are together and right sides are together.
Serge or sew down the short end of the strip, using our half inch seam allowance. Press the seam.
Now we have a circle. Fold the circle in half the long way, right sides out. Press.
Now, pin your cuff to your sleeve with the shirt seam and cuff seam aligned, right sides together and raw edges aligned. Gently stretch the cuff to fit the sleeve and pin again on the other side.
Serge or sew the cuff to the sleeve, gently pulling the cuff to match the sleeve length if needed.
 |
| All serged. |
Press seam allowance toward the top of the shirt. Coverstitch or topstitch the seam allowance down and you are finished!


Love love love this cardigan, Bryanna! You are INSPIRING!!!!
ReplyDeletelove,
Rachel